



 Breadboard Circuit Simulator
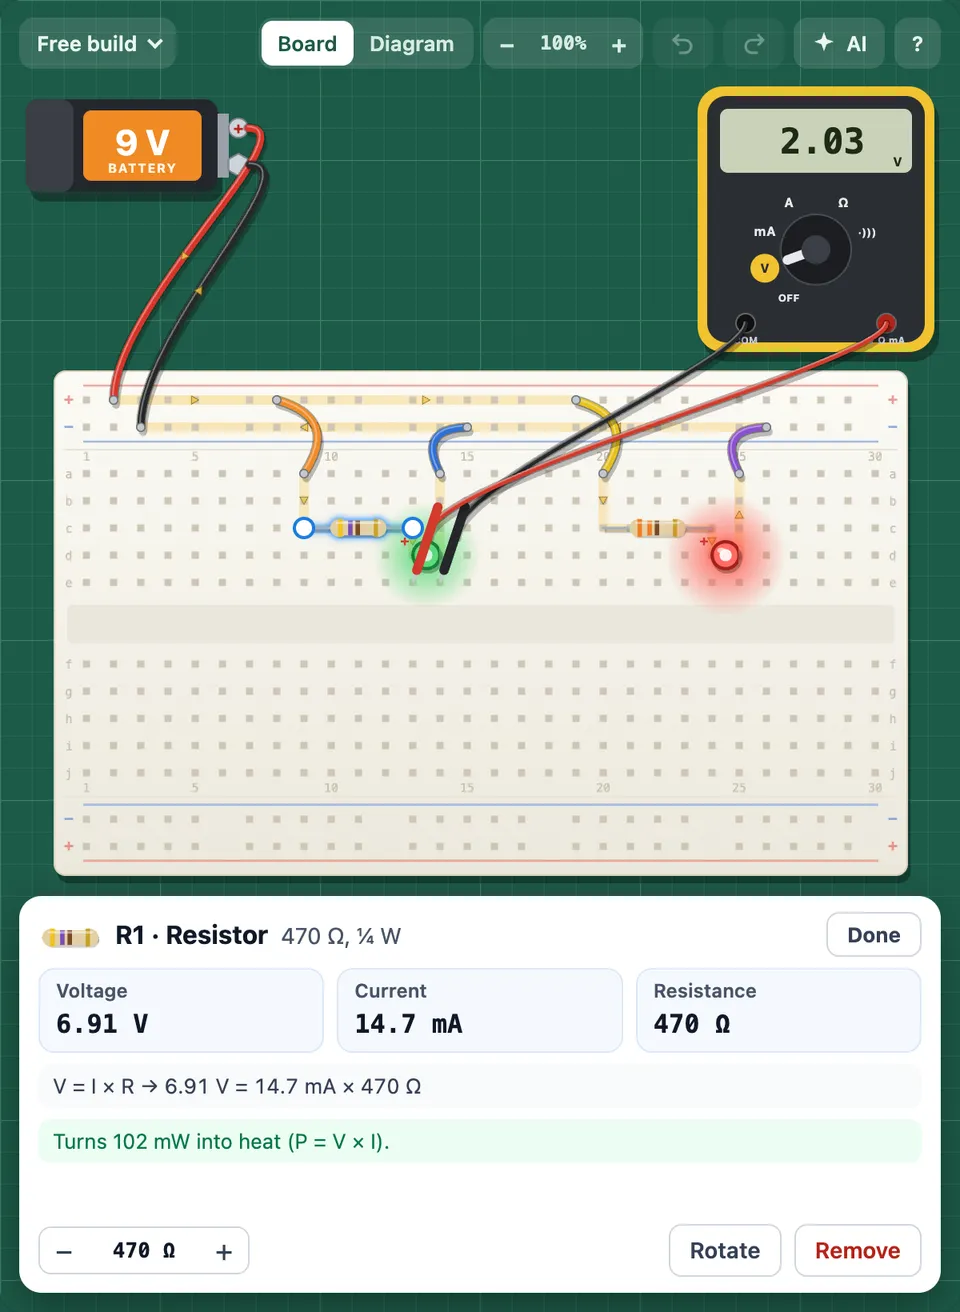
 lets you build real DC circuits on a breadboard and see what happens. Place a battery, resistors, LEDs, switches, capacitors, transistors, a 555 timer, motors, a fan, a bulb and more, wire them hole to hole, and read the volts, amps and ohms of every part with Ohm's law worked out using the live numbers.
Use Breadboard Circuit Simulator together on your board.
Parts behave like the real ones because the tile runs a proper circuit simulation over time. An LED burns out without a resistor, a capacitor takes time to charge, a motor needs enough current to start, a bulb filament glows from dull red to white, and a 555 timer blinks at the rate its formula predicts. Mistakes such as a short circuit or a backwards LED are explained in plain words.
It runs on a shared MockFlow board, so a whole class can use the same tile at once. Teachers can set an assignment that the tile checks by simulating each student's circuit, then review it with comments and a suggested score.
- Thirty parts in eight groups. Power sources, resistors and sensors, capacitors and coils, LEDs and diodes, transistors and a 555 timer, switches, a relay and a fuse, and motors, a fan, a bulb and a buzzer, all behind one + Add part button with search.
- Ohm's law on every part. Each part shows its volts, amps and ohms, with V = I × R, Q = C × V or the transistor gain worked out from the live values.
- Real circuit behaviour. LED forward voltage and burn out, internal resistance in batteries, capacitor charging over time, motor start current and spin up, relay pull in, fuse blowing and the coil spike when a relay switches off.
- A working multimeter. Volts, milliamps, amps, ohms and continuity. Put it across a battery on milliamps and its fuse blows, just like a real meter.
- Circuit diagram view. Switch between the breadboard and a circuit diagram of the same circuit, so students see how the two match.
- AI help. Ask AI to explain the circuit, find out why it is not working, change a value or build a circuit from a sentence. It reads the live simulated values. For students working on a task it gives hints, not answers.
- Assignments checked by simulation. Check that a part works, a current or voltage is in range, a switch controls something, an LED blinks at a rate, nothing is over its rating, a part is used, or only a set number of parts is used.
- Calm on the board. Nothing moves unless you ask: current shows as a soft glow, and Watch flow plays moving dots for a few seconds. Zoom and pan to work on fine details.
How to use Breadboard Circuit Simulator.
Add it to a board
Open Add anything with the plus button in the bottom toolbar, choose Artifacts and add Breadboard Circuit Simulator. Use on a board on this page opens a new board with it already on.
Start with the battery
The breadboard opens with a 9 V battery plugged into the rails. Tap Show me an example for a ready LED circuit, or tap + Add part to pick your own parts.
Place parts and wires
Tap a part to drop it in a free spot, or drag it onto the holes. Drag from one hole to another to add a wire. Point at a hole to see which holes are joined underneath.
Close the loop and read the numbers
Make a path from plus through your parts back to minus. Wires carrying current glow with arrows for the direction. Tap any part to see its voltage, current and resistance and the formula with real values.
Measure with the multimeter
Drag the red and black probes onto any two holes to read volts, or set the dial to mA and put the meter in the loop to read the current.
Set an assignment
Teachers tap Free build at the top left and choose Set an assignment: write the task, add checks, then give it to the class. Students check their circuit and hand it in, and the teacher reviews and returns it.
Who uses Breadboard Circuit Simulator.
A physics teacher introducing Ohm's law
Build an LED and resistor on the class board, step the resistor value and let students watch the current and brightness change with the formula beside it.
A student learning why LEDs need a resistor
Wire an LED straight to the battery and see it burn out, then add a resistor, tap Replace and work out the safe value.
An electronics class trying transistors and timers
Build a fan with a speed knob, a night light with a light sensor or a 555 blinking LED, and measure each stage with the multimeter.
A teacher setting homework on circuits
Set a task such as light a green LED between 10 and 15 mA, and let the tile check every circuit before you review and score it.
A STEM club exploring ideas
Ask AI to build a starting circuit from a sentence, then change parts and see what happens without buying any components.
Add Breadboard Circuit Simulator to your board.
Use on a board opens a new board with Breadboard Circuit Simulator already on it. To add it to a board you already have, follow these steps. Each copy keeps its own data, so a vote on one board never changes another.
Open your board
Open the MockFlow board you want to use it on.
Add it from the Artifact Library
Click Add anything (the plus button) in the toolbar at the bottom of the board, switch to Artifacts and pick Breadboard Circuit Simulator under Quizzes. Adding it does not use AI credits.
Use it together
Click Interact with Component (the hand button), or switch the board to Play mode. Everyone on the board uses the same app, and Reset shared data clears it for the next session.










 Brainstorm with MockFlow MCP


