How to Create a Process Map: A Step-by-Step Guide for Teams
TL;DR: A process map helps teams visualize how work moves from start to finish, including steps, decisions, owners, handoffs, and bottlenecks. This blog explains how to create a process map in seven steps, choose the right format, use common symbols, validate the workflow, and improve it with AI-assisted process mapping tools. |
Teams often know when a workflow is slow, unclear, or inconsistent. What is harder is turning that shared frustration into a clear view of how the process actually moves from start to finish.
A process flow map makes that work visible. It shows each step, decision, input, handoff, delay, and bottleneck in one place. Once the workflow is on the board, teams can stop relying on assumptions and start improving the process with shared context.
This process mapping guide walks through how to create a process map step by step. You’ll learn how to choose the right workflow, define scope, involve stakeholders, organize steps, use basic symbols, and create a faster first draft with an AI process flowchart generator.
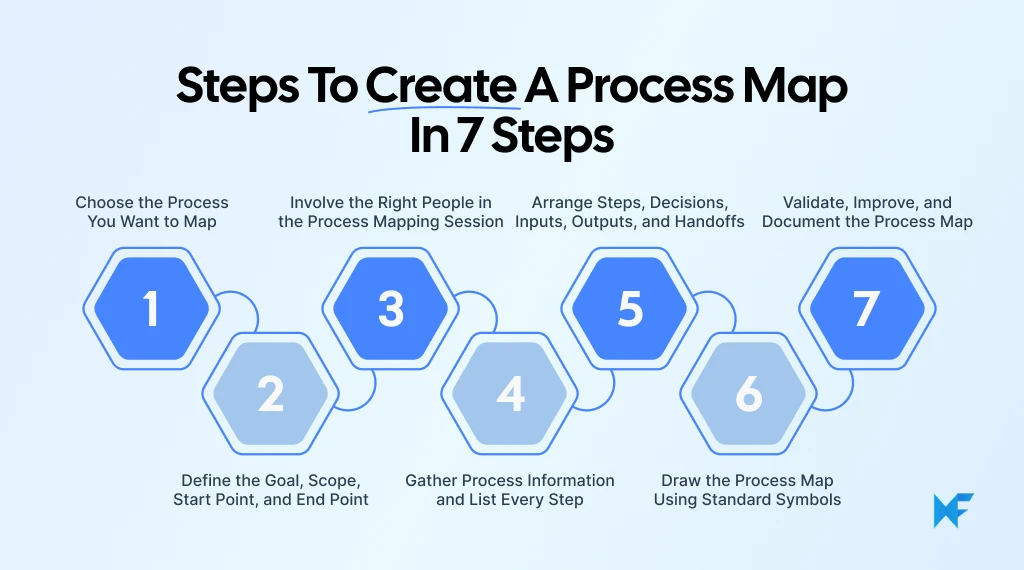
How to create a process map in 7 steps?
To create a process map, choose the process you want to document, define its scope, involve the right stakeholders, list every step, arrange the flow, add decisions and handoffs, and validate the final map with the team.
For a quick visual example, you can watch how IdeaBoard AI turns a work process description into a process flow diagram in under two minutes.
Before creating a process map, we must first accurately map the AS-IS process to show our current workflow. Once that is complete, we can use it to identify bottlenecks, create a TO-BE version of our optimized future state, document SOPs, or prepare the workflow for automation. Here are the steps that follows:
Step 1: Choose the process you want to map
Start with one specific process instead of trying to map an entire department or business function. A focused workflow is easier to document, review, and improve because everyone can agree where it begins, where it ends, and what problem it is meant to solve.
Good candidates are processes that are slow, inconsistent, error-prone, high-volume, frequently escalated, or dependent on multiple teams. For example, you might map customer support escalation, invoice approval, employee onboarding, purchase requests, order fulfilment, bug triage, or user access management.
According to Gartner, hyperautomation is a staple discipline for 90% of large enterprises globally; yet fewer than 20% have mastered measuring their initiatives, underscoring why documented, validated process maps are foundational before automation can be properly tracked or scaled.
Step 2: Define the goal, scope, start point, and end Point
Before you draw anything, define what the process map needs to achieve. The goal could be to reduce delays, remove duplicate work, document an SOP, train new employees, improve handoffs, or prepare the workflow for automation.
Also define where the process starts, where it ends, what is included, what is excluded, and how much detail the map needs. A leadership review may only need a high-level business process diagram, while SOP documentation may need owners, systems, exceptions, and decision paths.
Mapping Element | Question to Ask |
Goal | What do we want to improve or document? |
Start point | What event triggers the process? |
End point | What marks the process as complete? |
Scope | Which steps are included and excluded? |
Success metric | How will we know the process improved? |
Step 3: Involve the right people in the process mapping session
A process map should show how work actually happens, so involve people who perform, manage, approve, depend on, or are affected by the workflow. This usually includes the process owner, people doing the work, upstream and downstream teams, subject matter experts, managers, and decision-makers.
For regulated or quality-sensitive workflows, bring in compliance or quality reviewers early. For customer-facing processes, include support, success, or sales teams because they often know where the workflow breaks in practice.
For collaborative mapping, visual whiteboarding tools like IdeaBoard can help teams map workflows together in real time. IdeaBoard supports diagramming, workflow templates, and team-based process mapping, which makes it useful when the process crosses roles or departments.
Step 4: Gather process information and list every step
Now collect the raw information behind the AS-IS process. Use stakeholder interviews, SOPs, existing documentation, tickets, forms, logs, CRM records, support data, tool screenshots, process walkthroughs, and metrics such as cycle time, wait time, error rate, rework, or approval time.
List every step first without trying to make the map perfect. Then separate the information into:
- Tasks or activities
- Inputs and outputs
- Decision points
- Owners or teams
- Systems and tools
- Documents or records
- Exceptions and rework loops
This gives you the building blocks for a clear process flow map.
Step 5: Arrange steps, decisions, inputs, outputs, and handoffs
Turn the raw step list into a logical workflow by sequencing the process from trigger to outcome. Add decisions where the process branches, mark approvals clearly, show handoffs between roles or teams, and include the inputs and outputs that move the work forward.
Also capture rework loops, exceptions, wait states, and bottlenecks. These details are often where the most useful process improvement opportunities appear.
Before drawing the map, confirm:
- Every step has an owner
- Decisions are clear
- Handoffs are visible
- Inputs and outputs are defined
- Exceptions are captured
- The process has a clear end state
Step 6: Draw the process map using standard symbols
Once the flow is clear, draw the process map using simple, recognisable symbols. Use ovals for start and end points, rectangles for process steps, diamonds for decisions, arrows for direction, and swimlanes when multiple roles, teams, departments, or systems are involved.
Most teams do not need complex notation for everyday business process mapping. The map simply needs to be clear enough for stakeholders to read, review, and improve.
You can draw it manually or create a faster first draft with IdeaBoard’s AI Process Flowchart Generator. IdeaBoard also supports editable process diagrams with drag-and-drop shapes, connectors, templates, and AI-assisted diagram generation.
Step 7: Validate, improve, and document the process map
Review the first version with the people who execute or manage the process before treating it as final. Ask them to walk through the workflow from start to finish so you can catch missing steps, incorrect owners, unclear decisions, and undocumented workarounds.
Once the AS-IS process is accurate, use it to:
- Identify bottlenecks, delays, and duplicate work
- Spot unclear ownership or unnecessary handoffs
- Find rework loops and approval gaps
- Create a TO-BE version for the future-state workflow
- Turn the final map into SOP documentation, training material, or an automation brief
This is where validation turns the process map from a diagram into a decision-making tool. In BearingPoint’s 2024 Process Management Study, organizations reported satisfactory achievement across key goals, including compliance and regulatory requirements at 67%, process quality at 64%, and customer satisfaction at 61%. Those outcomes depend on having a process map that reflects the real workflow.
Teams using IdeaBoard can share the board with stakeholders or export the finished process map for documentation and review.
Once we have the steps, owners, decisions, and handoffs clear, the next question is format. Not every workflow needs the same type of process map. A simple approval workflow may only need a basic flowchart, while a cross-functional business process may need swimlanes, and a process improvement project may need an AS-IS and TO-BE view.
Which type of process map should we use?
Before we draw a process map, we should choose the format that best fits the workflow. The right choice depends on the process goal, complexity, number of stakeholders, and level of detail required.
Process Map Type | What It Shows | Best Used When |
Basic flowchart | A simple sequence of steps and decisions | You need to explain a straightforward workflow quickly |
Swimlane diagram | Steps grouped by role, team, or department | The process involves multiple people, teams, or handoffs |
BPMN diagram | A formal business process diagram with standard notation | The process is complex, compliance-heavy, or needs technical and business alignment |
Value stream map | Flow of work, delays, waste, and value-added steps | You want to improve efficiency, reduce wait time, or apply Lean thinking |
SIPOC diagram | Suppliers, inputs, process, outputs, and customers | You need a high-level process overview before detailed mapping |
AS-IS process map | The current version of the workflow | You need to understand how the process works today |
TO-BE process map | The improved future-state workflow | You are redesigning, automating, or standardizing the process |
Detailed process map | Tasks, decisions, roles, exceptions, documents, and systems | The process needs deep documentation for SOPs, audits, training, or improvement |
The right format matters most when the map will guide improvement work.
For example, a 2024 peer-reviewed BPM case study reported a 96% time reduction after applying BPM lifecycle methods, process redesign, selective automation, and dashboards. That should not be treated as a general benchmark, but it shows why detailed mapping can be useful when a process is ready for serious redesign.
For most teams, the best starting point is a basic flowchart or swimlane diagram. Use a BPMN diagram only when the process needs formal modelling, and use value stream mapping when the main goal is process improvement.
If the team is still trying to understand the current workflow, start with an AS-IS map before creating a TO-BE version.
No matter which format you choose, the map only works if everyone can read it quickly. That is where process mapping symbols help, giving each step, decision, input, and handoff a clear visual meaning.
What are process mapping symbols?
Process mapping symbols are visual cues that show what each part of the workflow represents. They make the map easier to read, especially when the process includes decisions, inputs, outputs, documents, or handoffs between teams.
- Oval: Shows the start or end of a process.
- Rectangle: Represents a process step, task, or activity.
- Diamond: Shows a decision point where the process branches.
- Arrow: Shows the direction of the workflow.
- Parallelogram: Represents an input or output, such as a form, file, or data entry.
- Document symbol: Shows a document, report, checklist, or SOP.
- Swimlane: Groups steps by team, role, department, or system.
Most teams do not need complex notation for everyday business process mapping. For common workflows, these simple symbols are enough to create a map that people can understand and validate. More formal notation like BPMN is useful when the process requires standardized modelling across technical, operational, or compliance teams.
Once the symbols and structure are clear, the process map does not always need to start from a blank canvas. If you already know the workflow details, an AI process flowchart generator can turn that information into a first draft we can review and refine.
How to create a process map with an AI process flowchart generator?
IdeaBoard’s AI Process Flowchart Generator is useful when you need to move quickly from process notes to a visual workflow. The key is to give the tool enough context so the first draft reflects the real process, instead of producing a generic flowchart.
Here is a simple way to do it:
- Write a clear process prompt: Include the process name, start point, end point, stakeholders, systems, and desired output. The more specific the prompt is, the easier it is to generate a useful process flow map.
- Mention roles, teams, or swimlanes: Add the people, teams, departments, or systems involved in the process. This helps the generated map show ownership, handoffs, and cross-functional movement more clearly.
- Include major decisions and exceptions: Mention approvals, rejected paths, missing information, rework loops, delays, or escalation points. These are the details that make the map useful for process improvement, rather than just documentation.
- Generate the first process flowchart: Use the AI-generated output as a working draft, not the final source of truth. It gives the team something structured to react to, which is often faster than starting from an empty board.
- Review and refine the map: Check the sequence, missing steps, incorrect assumptions, handoffs, decision paths, and exception flows. This is where the process map becomes specific to your team’s actual workflow.
- Validate with stakeholders: Share the draft with the people who perform or manage the workflow. They can confirm what is accurate, point out undocumented workarounds, and flag steps that look correct on paper but fail in practice.
- Use the final map for documentation or improvement: Once approved, convert the process map into SOP documentation, training material, process improvement tasks, or automation requirements.
For instance, here is a prompt example you can adapt:
“Create a process flow map for employee onboarding. Start when a candidate accepts an offer and end when the employee completes first-week onboarding. Include HR, IT, finance, hiring manager, and new employee swimlanes. Show document collection, equipment provisioning, payroll setup, access creation, manager onboarding tasks, and decision points for missing documents or delayed access.”
For teams that need to keep refining the map together, IdeaBoard supports editable diagrams, workflow templates, AI-assisted diagram or flowchart generation, and real-time collaboration. You can also use IdeaBoard’s prompt library to structure common mapping workflows faster, especially when the process involves multiple teams or repeated documentation work.
IdeaBoard also supports MCP integration, so teams using tools like Cursor, Claude, or other MCP-compatible AI assistants can generate flowcharts, mind maps, diagrams, and other visualizations directly from their AI workspace. For process-heavy teams, this is useful when they need to create multiple boards quickly, such as AS-IS workflows, TO-BE workflows, system flows, and supporting diagrams, then continue refining them in IdeaBoard.
What to do after creating a process map?
Once the process map is created, use it as a working tool rather than a static diagram. The next steps should help the team confirm accuracy, improve the workflow, and turn the map into something useful for day-to-day work.
- Review the map with stakeholders to confirm the sequence, owners, decisions, and handoffs.
- Highlight bottlenecks, delays, duplicate work, rework loops, and unclear responsibilities.
- Create a TO-BE version if the current process needs to be redesigned or standardised.
- Convert the approved map into SOP documentation, training material, or an automation brief.
- Assign owners for each process change so improvements do not stay at the discussion stage.
- Share or export the final process map for documentation, review, or team reference.
- Review the process map periodically as tools, teams, requirements, or approval paths change.
A process map is complete only when it helps people understand the workflow and act on it. Once it has been validated, shared, and assigned clear next steps, it becomes a practical reference for improving how the work gets done.
Conclusion
The best process maps give teams a shared way to fix what is slowing the work down. Once everyone can see where the process breaks, the next step is to fix it.
That is where IdeaBoard fits well. Teams can generate process flowcharts quickly with AI to turn a written workflow into a structured first draft, then edit the map visually as your team reviews each step.
Instead of rebuilding the process across separate docs, spreadsheets, and meeting notes, you get one shared canvas where teams can refine handoffs, add missing decisions, compare AS-IS and TO-BE flows, and turn the final map into documentation everyone can refer back to.
If you are ready to map a real workflow, start with one process that needs clarity. Sign up on IdeaBoard for free, generate your first process map, and give your team a working draft they can improve together.
FAQs
1. How do you create a process map step by step?
To create a process map, choose one workflow, define the goal and scope, involve the right stakeholders, list every step, arrange the flow, add decisions and handoffs, draw the map, and validate it with the team before using it for improvement or documentation.
2. What is the first step in process mapping?
The first step in process mapping is choosing one specific process with clear boundaries. Start with a workflow such as invoice approval, employee onboarding, or customer support escalation instead of trying to map an entire department or business function at once.
3. What should be included in a process map?
A process map should include the start point, end point, tasks, decisions, owners, inputs, outputs, handoffs, systems, exceptions, and delays. The right level of detail depends on whether the map is for SOP documentation, training, process improvement, or automation planning.
4. What is the difference between a process map and a flowchart?
A flowchart usually shows a simple sequence of steps and decisions. A process map often includes more operational context, such as roles, handoffs, systems, inputs, outputs, exceptions, bottlenecks, and improvement opportunities across the workflow.
5. What are the basic process mapping symbols?
The basic process mapping symbols are ovals for start and end points, rectangles for tasks, diamonds for decisions, arrows for flow direction, parallelograms for inputs and outputs, document symbols for files or reports, and swimlanes for roles, teams, or systems.
6. Can AI create a process map?
Yes. IdeaBoard’s AI Process Flowchart Generator can turn a written workflow description into an editable process map draft. Teams can then refine the steps, decisions, swimlanes, and handoffs together, so the final map reflects how the process actually works.

Importance of Wireframing in Product Design Process
Introduction Skipping wireframes can feel like saving time until the team starts debating layout, user flow, content, and...
Sales Process Flow Diagram: Stages, Example, and How to Create One
Sales teams often know their pipeline stages, yet the actual path from first contact to closed deal can still feel...

What Is a UI Kit? Definition, Benefits, Types, and Examples
UI kits are one of the most widely used tools in modern UI design — yet they’re often misunderstood or underutilized. At their...
